Rediscovering the charm of vintage furniture offers a unique blend of nostalgia and creativity. DIY restoration projects allow you to breathe new life into cherished pieces, transforming outdated items into stylish and functional additions to your home. This journey explores the rewarding process of restoring vintage furniture, from identifying suitable pieces and gathering essential tools to mastering restoration techniques and embracing creative upcycling.
This guide provides a comprehensive approach to undertaking DIY vintage furniture projects, covering everything from assessing the condition of a piece and selecting appropriate materials to executing various restoration techniques safely and effectively. We’ll delve into different vintage furniture styles, providing insights into their historical context and distinctive characteristics to aid in your project selection and execution.
Introduction to DIY Vintage Furniture
The allure of vintage furniture lies not only in its aesthetic charm but also in its enduring quality and unique history. From the elegant curves of Art Deco pieces to the sturdy craftsmanship of mid-century modern designs, vintage furniture offers a tangible connection to the past. This enduring appeal has fueled a growing interest in DIY restoration and upcycling, transforming old pieces into cherished heirlooms for a new generation.DIY vintage furniture projects offer a rewarding blend of creativity, problem-solving, and historical appreciation.
Restoring a vintage piece allows you to express your personal style while giving a second life to a piece of history. The process itself can be deeply satisfying, transforming a worn-out piece into a beautiful and functional addition to your home.
Reasons for Restoration Over Replacement
Many individuals choose to restore rather than replace furniture for a multitude of reasons. Financial considerations are often a primary driver. High-quality vintage pieces, even when requiring restoration, can be significantly more cost-effective than purchasing new furniture of comparable quality and craftsmanship. Furthermore, restoration often aligns with environmentally conscious values. By repurposing existing furniture, individuals reduce waste and lessen the environmental impact associated with manufacturing new products.
Finally, restoring vintage furniture provides a unique opportunity to connect with a piece’s history and create a personalized item reflecting individual taste and style. The sentimental value of a restored family heirloom, for instance, far surpasses that of a mass-produced contemporary piece.
Identifying Suitable Vintage Furniture for DIY Projects

Choosing the right vintage furniture piece for a DIY project is crucial for a successful outcome. Careful assessment of the piece’s condition, coupled with a realistic evaluation of your skills and resources, will determine whether a project is feasible and enjoyable. Ignoring these factors can lead to frustration and a potentially ruined piece.Assessing the condition of a vintage piece requires a keen eye and methodical approach.
Don’t rush the process; a thorough inspection will save you time and effort later.
Furniture Condition Assessment
A comprehensive assessment involves examining several key areas. First, check for structural integrity. Are there any cracks, wobbly legs, or loose joints? Examine the frame closely, paying attention to any signs of wood rot, insect infestation (wormholes are a common indicator), or significant damage. Next, assess the surface condition.
Look for scratches, dents, water stains, and peeling veneer. Note the presence of any previous repairs or patching. Finally, consider the overall completeness of the piece. Are all parts present? Are there any missing pieces or broken components?
Consider whether replacement parts can be easily sourced or fabricated. For example, a missing drawer pull might be easily replaced, but a broken leg might require more significant carpentry skills.
Project Feasibility Factors
Selecting a project involves considering your skills, available tools, and the complexity of the restoration. Beginners should start with simpler projects, such as refinishing a small table or chair, rather than tackling a large, intricate armoire. The material of the piece also plays a crucial role. Solid wood is generally easier to work with than veneer or particleboard.
Consider the tools you have available. Do you have the necessary sandpaper, paint, brushes, and other equipment? Lacking essential tools can significantly extend the project timeline or even make it impossible. For instance, attempting to repair intricate joinery without appropriate clamps and woodworking tools would be challenging.
Vintage Furniture Evaluation Checklist
Before committing to a project, use this checklist to evaluate a piece’s restoration potential:
- Structural Integrity: Assess the overall stability and strength of the piece. Are there any significant cracks, breaks, or loose joints?
- Material Type: Identify the material (wood type, veneer, etc.). Solid wood is generally preferable for beginners.
- Surface Condition: Evaluate the extent of damage, including scratches, dents, stains, and peeling.
- Completeness: Determine if all parts are present. Can missing parts be easily replaced or repaired?
- Complexity: Assess the level of skill and tools required for restoration. Choose a project appropriate for your skill level.
- Style and Personal Preference: Does the piece’s style appeal to you? Will the restored piece complement your home decor?
- Time Commitment: Realistically assess the time you can dedicate to the project. Factor in unexpected delays.
- Budget: Estimate the cost of materials, tools, and any necessary repairs.
By carefully considering these factors, you can significantly increase your chances of a successful and rewarding DIY vintage furniture project.
Essential Tools and Materials for DIY Vintage Furniture Restoration
Successfully restoring vintage furniture requires the right tools and materials. Choosing wisely ensures a smooth process and a high-quality, long-lasting finish. Investing in quality tools and materials upfront will save you time and frustration in the long run, ultimately resulting in a superior final product.
Essential Tools for Vintage Furniture Restoration
A well-equipped workshop is crucial for tackling any restoration project. The tools needed can be broadly categorized by their function. Having these tools readily available will streamline the restoration process and improve the overall quality of your work.
- Woodworking Tools: This category includes essential tools for preparing the wood surface. Examples include a variety of screwdrivers (Phillips and flathead), a hammer, wood chisels (various sizes), a hand saw or jigsaw, sandpaper (various grits), a measuring tape, and a level.
- Painting and Finishing Tools: These tools are essential for applying paint, stain, and protective finishes. You’ll need brushes (various sizes), rollers, paint trays, drop cloths, and possibly a spray gun (for a more even finish). Also consider safety equipment such as a respirator mask and safety glasses.
- Other Essential Tools: Beyond woodworking and painting, you’ll need additional tools. These include a putty knife for applying wood filler, clamps for holding pieces together during repairs, a tack cloth for removing dust, and cleaning rags. A good quality work light will also be invaluable.
Sample Shopping List for Materials
The specific materials you’ll need will depend on the condition of the furniture piece and your chosen restoration approach. However, a typical restoration project will often require the following:
- Wood Filler: Choose a high-quality wood filler that matches the color of your furniture as closely as possible. This is used to fill in cracks, holes, and other imperfections in the wood.
- Primer: A good primer is essential for creating a smooth, even surface for paint or stain. It helps to prevent the wood from absorbing the topcoat unevenly and improves adhesion.
- Paint or Stain: Select a high-quality paint or stain that is suitable for furniture and is durable enough to withstand wear and tear. Consider the color and finish you desire.
- Varnish or Polyurethane: This provides a protective layer over the paint or stain, safeguarding the furniture from scratches, moisture, and other damage. Consider a satin or semi-gloss finish for a more durable and less-reflective surface.
- Sandpaper: You’ll need a variety of grits, from coarse for initial sanding to fine for smoothing the surface before painting or staining.
Importance of High-Quality Materials
Using high-quality materials is crucial for achieving a professional-looking finish and ensuring the longevity of your restoration project. Inferior materials may crack, chip, peel, or fade quickly, rendering your hard work ineffective. For example, cheap paint might not adhere properly, leading to peeling and chipping, while low-quality wood filler might shrink or crack, ruining the repaired area. Investing in premium materials will ultimately result in a superior, more durable, and aesthetically pleasing piece of furniture that will last for years to come.
The difference in cost is often minimal compared to the value of the finished product and the time invested in the project.
Specific DIY Vintage Furniture Projects
This section details three distinct DIY vintage furniture projects, offering step-by-step guides, material lists, and vivid descriptions of the process. Each project focuses on a different type of furniture, showcasing the versatility of upcycling and restoration techniques. Remember to always prioritize safety and wear appropriate protective gear during these projects.
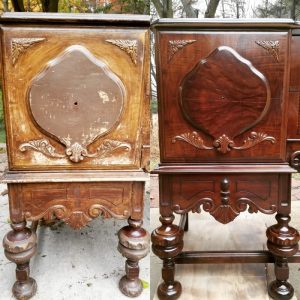
Refinishing a Vintage Wooden Chair
This project focuses on restoring a vintage wooden chair to its former glory, showcasing a complete refinishing process. The goal is to remove old paint, sand the wood, apply a stain, and seal the finish for lasting protection.
Step 1: Stripping the Old Paint. Begin by carefully removing any existing paint or varnish. A chemical stripper is effective, but requires proper ventilation and safety precautions, including gloves and eye protection. Alternatively, a heat gun can be used, but this requires careful control to avoid damaging the wood. The process involves applying the stripper, allowing it to work, and then scraping away the softened paint with a putty knife.
Thorough cleaning with mineral spirits is crucial after stripping.
Step 2: Sanding the Wood. Once the old finish is removed, sand the chair thoroughly. Start with coarser grit sandpaper (e.g., 80-grit) to remove any imperfections and then progressively move to finer grits (e.g., 120-grit, then 220-grit) for a smooth finish. Sanding should be done in the direction of the wood grain to avoid scratches. A random orbital sander can significantly speed up this process.
Imagine the smooth, even surface revealed after this meticulous sanding.
Step 3: Staining the Wood. Choose a stain that complements the chair’s style and your desired aesthetic. Apply the stain evenly with a brush or rag, following the manufacturer’s instructions. Multiple coats may be necessary to achieve the desired depth of color. Allow each coat to dry completely before applying the next.
Visualize the rich color enhancing the chair’s natural wood grain.
Step 4: Sealing the Finish. Finally, seal the stained wood with a clear varnish or polyurethane. This protects the wood from moisture and wear. Apply several thin coats, allowing each to dry completely before applying the next. A high-quality sealant ensures a durable and long-lasting finish.
Picture the final result: a beautifully restored chair with a glossy, protective coat.
Restoring a Vintage Side Table with Inlay Work
This project involves restoring a vintage side table featuring intricate inlay work. The process requires careful attention to detail and addresses the unique challenges presented by inlaid pieces.
Step 1: Assessing the Damage. Begin by carefully examining the table for any damage, including loose or missing inlay pieces, scratches, and cracks in the wood. Note the type of wood used in both the base and the inlay to ensure compatibility with any repair materials.
Step 2: Repairing the Inlay. Loose inlay pieces can be carefully reglued using a high-quality wood glue. Missing pieces may require replacement, which can be challenging and might necessitate finding a matching wood type or employing creative solutions such as using a contrasting wood for a unique touch. Imagine carefully placing each tiny piece back in its place.
Step 3: Cleaning and Refinishing. Clean the table’s surface gently to remove dust and dirt. Minor scratches can be carefully sanded using very fine-grit sandpaper. A light application of a suitable wood polish or wax can enhance the finish and protect the inlay work. The final step would be to apply a protective coat of clear varnish, carefully avoiding the inlaid areas to prevent obscuring the detail.
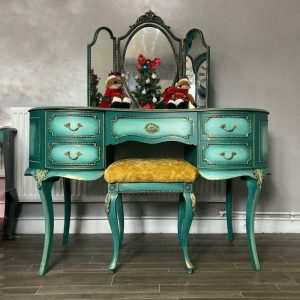
Upcycling a Vintage Dresser
This project transforms a vintage dresser through repainting and adding new hardware. The focus is on updating the aesthetic without losing the charm of the original piece.
Step 1: Preparation. Clean the dresser thoroughly, removing any loose paint or debris. Sand the surface lightly to create a smooth base for the new paint. If the dresser has any significant damage, repair it before proceeding.
Step 2: Painting. Choose a paint color that complements your decor. Apply several thin coats of paint, allowing each coat to dry completely before applying the next. Consider using a primer for better adhesion and coverage. Picture a fresh coat of vibrant color completely transforming the dresser’s appearance.
Step 3: New Hardware. Replace the old hardware with new knobs or pulls that match your desired style. This simple change can dramatically update the look of the dresser. Imagine the dresser with shiny new knobs, reflecting light and enhancing the overall aesthetic.
Vintage Furniture Styles and Their Characteristics
Understanding the various styles of vintage furniture is crucial for both restoration and appreciation. This knowledge allows you to accurately identify a piece, understand its historical context, and appreciate its unique design elements. This section will explore some of the most popular vintage furniture styles, highlighting their defining characteristics.
Mid-Century Modern Furniture
Mid-Century Modern furniture, generally spanning from the 1930s to the 1960s, is characterized by its clean lines, organic shapes, and functional design. It often emphasizes simplicity and a rejection of overly ornate styles.
- Materials: Common materials include teak, walnut, and other hardwoods, often with minimal veneers. Plywood was also frequently used for its strength and affordability.
- Shapes: Furniture features flowing curves, tapered legs, and geometric forms. Think of iconic pieces like the Eames Lounge Chair or the Tulip table.
- Ornamentation: Ornamentation is minimal, focusing on the inherent beauty of the materials and the craftsmanship. Simple details, such as subtle wood grain patterns, are often highlighted.
Victorian Furniture
Victorian furniture, prevalent during the reign of Queen Victoria (1837-1901), is known for its opulent and ornate style. It represents a period of significant technological advancements that allowed for mass production and a wider availability of decorative elements.
- Materials: Rich, dark woods such as mahogany, rosewood, and ebony were favored. Inlays of mother-of-pearl, ivory, and other precious materials were common.
- Shapes: Furniture often featured elaborate carvings, curved lines, and a generally heavier, more substantial feel. Think of heavily carved armchairs, ornate dressers, and large, imposing beds.
- Ornamentation: Ornamentation is extensive, featuring intricate carvings, elaborate upholstery, and decorative details such as fretwork and gilding.
Art Deco Furniture
Art Deco, flourishing in the 1920s and 1930s, is characterized by its geometric shapes, streamlined forms, and luxurious materials. It reflects the optimism and technological advancements of the era.
- Materials: Expensive materials like chrome, lacquer, glass, and exotic woods were frequently used. Bold colors and patterns were also characteristic.
- Shapes: Furniture features strong geometric shapes, such as zigzags, chevrons, and sunbursts. Streamlined forms and a sense of symmetry are prevalent.
- Ornamentation: Ornamentation often incorporated geometric patterns, stylized motifs (such as sunbursts and stylized flora and fauna), and luxurious materials.
Identifying Vintage Furniture Styles
Identifying the style of a vintage furniture piece involves a careful examination of several factors. Consider the piece’s materials, shapes, ornamentation, and overall aesthetic. Comparing the piece to known examples of different styles, using reference books or online resources, can aid in accurate identification. Detailed attention to construction techniques, such as joinery, can also provide valuable clues.
The provenance of the piece, if known, can further assist in style determination.
Safety Precautions and Best Practices
DIY vintage furniture restoration is a rewarding hobby, but safety should always be the top priority. Working with woodworking tools and finishes involves inherent risks, and neglecting safety precautions can lead to serious injury or damage. This section Artikels essential safety measures to ensure a safe and productive restoration process.Proper ventilation and personal protective equipment (PPE) are crucial for mitigating risks associated with dust, fumes, and chemical exposure.
Similarly, environmentally conscious disposal of waste materials is essential for minimizing the environmental impact of your project.
Woodworking Tool Safety
Safe operation of woodworking tools requires attentiveness and adherence to manufacturer’s instructions. Always ensure tools are properly maintained, sharp, and securely fastened before use. Never operate machinery while fatigued or under the influence of drugs or alcohol. Maintain a clean and organized workspace to prevent accidents caused by tripping hazards or cluttered areas. When using power tools, always use appropriate safety guards and never reach across the cutting path.
Before beginning any project, carefully plan each step to minimize the risk of accidental cuts, slips, or falls. For example, using a push stick when working with a table saw is crucial to prevent your hand from coming into contact with the blade. Always disconnect power tools before making adjustments or cleaning them.
Personal Protective Equipment (PPE)
Personal protective equipment is essential for minimizing the risk of injury during the restoration process. This includes wearing safety glasses or a face shield to protect your eyes from flying debris, dust, and chemical splashes. A dust mask or respirator is necessary to filter out fine wood dust and harmful particles from finishes. Hearing protection, such as earplugs or earmuffs, should be used when operating loud machinery.
Work gloves protect your hands from splinters, cuts, and chemical irritants. Appropriate clothing, such as long sleeves and pants, provides additional protection from sharp objects and flying debris. Consider a full-face respirator when working with strong solvents or stains to prevent inhalation of hazardous fumes.
Ventilation and Dust Control
Adequate ventilation is critical to reduce exposure to wood dust and harmful fumes from finishes. Work in a well-ventilated area, preferably outdoors or in a space with a dust collection system. Use a respirator or dust mask designed for wood dust to minimize inhalation. Regularly clean your workspace to remove dust and debris. Consider using a shop vacuum with a HEPA filter to efficiently remove fine dust particles.
If working indoors, open windows and doors to increase air circulation. A dedicated ventilation system, such as a dust collector connected to power tools, is highly recommended for larger projects or when working with particularly dusty materials.
Environmentally Friendly Waste Disposal
Dispose of waste materials responsibly to minimize environmental impact. Separate wood scraps, metal shavings, and finishing materials for appropriate disposal. Many municipalities have designated recycling centers for wood and metal. Leftover finishes and solvents should be handled according to local regulations and manufacturer’s instructions. Never pour solvents or finishes down the drain.
Consider using water-based finishes whenever possible to reduce the environmental impact of your project. Reuse or repurpose wood scraps whenever feasible. For example, smaller pieces can be used for future projects or crafting.
Transforming old furniture into beautiful, functional pieces is a rewarding experience that combines skill, creativity, and a respect for history. By carefully selecting your project, gathering the necessary tools and materials, and following safe practices, you can create unique and lasting additions to your home. Embrace the challenge, enjoy the process, and revel in the satisfaction of bringing vintage furniture back to its former glory (or even better!).
Question & Answer Hub
What type of wood glue is best for vintage furniture repairs?
A high-quality, wood-specific PVA (polyvinyl acetate) glue is generally recommended for its strength and water resistance. Yellow carpenter’s glue is a popular choice.
How do I remove stubborn old paint from vintage furniture?
Chemical paint strippers are effective, but require careful ventilation and protective gear. Mechanical methods like sanding or scraping can also be used, though they are more labor-intensive.
Where can I find vintage furniture for restoration projects?
Thrift stores, antique shops, flea markets, online marketplaces (like eBay or Craigslist), and even curbside finds can yield excellent candidates for restoration.
What are some environmentally friendly ways to dispose of leftover materials?
Properly dispose of chemical strippers and finishes according to local regulations. Recycle or repurpose scrap wood whenever possible.